Grow you own mushrooms – round 1

I grew my first bunch of mushrooms with my mushroom grow kit. I was pretty impressed at how large they grew! I probably shouldn’t have let them get as big as they did but I was fascinated at seeing how they changed everyday. Here’s the pictures showing the growth for ten days:

We started with just a block of stuff that looked like spent beer grains, covered it with a moisture tent, kept it moist, and two days later a mushroom started popping out!

20121007-194827.jpg

Day 2

20121007-194858.jpg

Day 3

20121007-194930.jpg

Day 4

20121007-195008.jpg

Day 5, I was surprised to see the mushrooms growing together instead of a lot of individual stalks. There were several that grew up like conjoined twins. I really don’t know how that happened.

20121007-195026.jpg

Day 6

20121007-195110.jpg

Day 8, I am not sure why the mushrooms only grew out of the top of the block either. I imagined that they would grow out all over the place… that’s what it looked like in my head anyway…

20121007-195136.jpg

20121007-195156.jpg

Day 9, The mushrooms were starting to get so big that they were starting to touch the moisture tent!

20121007-195218.jpg

20121007-195234.jpg

20121007-195246.jpg

Day 10, I decided it was time to stop watching them grow and actually harvest them.

20121007-195314.jpg

20121007-195326.jpg

Here’s what the block looked like after I picked them all off. The instructions said to soak the block over night in water to “reactivate” it and more mushrooms will grow. I hope it works! The block feels a lot lighter and looks smaller than what I started with.

20121007-195339.jpg

Here we are, 4 (or 5) pretty large shiitake mushrooms!

20121007-195351.jpg

This one was bigger than my hand! It is also the one I ate first – I added it to some pho I ordered that night. It was yummy!

20121007-195400.jpg

Well my first try at growing my own mushrooms was kind of a success. I really thought I would have mushrooms popping out all over the block. I wasn’t expecting only 4-5 to grow at once. I hope that more grow during the 2nd round of the block.

If it seems like the block is not producing any more mushrooms, I am going to try to put it in the back yard with some logs and hope that the spores spread. I might have a mushrooms garden in my backyard next spring!

Advertisement

Spaghetti Squash

My friend asked me about recipes for spaghetti squash the other day and I though I would post a small collection of some of my favorites.

If you haven’t tried spaghetti squash… you should! It’s a good substitute for actual spaghetti if you are trying to lay off the carbs. I personally can’t give up pasta or I will starve to death, but I do like to eat different things once in a while…

There are a few different ways to cook the squash. It is pretty neat once it is cooked and the flesh turns soft. The flesh turns into long fibrous strings that you can remove just by scraping with a fork. Check out what they look like:

20121008-174215.jpg

I cooked this squash in the microwave by cutting it in half and placing it in a baking dish upside down with a small amount of water. Though I don’t usually cook many things in the microwave, it is the quickest method to cook the squash. It takes about ten minutes to get soft and you can’t really screw it up. If you bake it in the oven it will take 30-40 minutes, you should still add water to the baking dish and cook it cut side down. You could also boil it, which does take longer and tastes the same so I don’t really think it’s worth it.

No matter which way you cook it, you should try to let it drain once you have scooped it out of the skin. It will make whatever you are adding to it watery if you don’t drain off the extra water.

I usually just add my favorite sauce on top, just like spaghetti. If you mix in a little butter, salt, and parmesan cheese to the plain squash it makes it even better! You could also add crime fraiche if you want to get fancy…and delicious.

We had beef short rib ragu on top of spaghetti squash tonight for dinner, along with a mixture of fall veggies.

20121008-174522.jpg

Here are some of my other favorite recipes from around the web:

A very simple side dish

A Greek version

With shrimp on top

Roasted and sweet

I can’t seem to find my favorite recipe online, but I will tell you all about it. I’ll have to cook it up next time I get a spaghetti squash at market and write out the exact quantities. I don’t think it should be too hard to figure out. I made a very creamy casserole out of a pretty big squash one time – cooking the squash in the microwave, scraping it out, draining it, and then mixing it with a few simple but delicious ingredients. I included creme fraiche, fresh thyme, crushed pink peppercorns, nutmeg, butter, and the squash strands all in a bowl and mixed. Everything went into a casserole dish and into the oven until it bubbled. It was a rich and delicious side dish, perfect for a fall meal.

Experiment yourself! You could add pretty much anything to this squash. It takes the flavors of whatever you add to it, so it is super versatile!

Grow your own mushrooms

My awesome husband bought us something really cool…

Grow Your Own Mushrooms Kit!

20120921-172639.jpg

These photos show just the beginning stages of the mushrooms sprouting. He did order shiitake mushrooms but this first little nub that is growing looks kind of like a cremini mushroom. It does look lighter in color so I hope they got it correct – but I like cremini mushrooms too so it wouldn’t be a disaster if we received the wrong type! Time will tell…

Here’s what the set up looks like:


20120921-172541.jpg


The block of growing material is inoculated with the mushrooms spores of your choice and mailed to you in a plastic bag. You remove the block from the bag and place it on an upside down pie plate – or something similar – but a pie plate was suggested. I’m guessing because it is going to get pretty gross and fungus covered… so you’ll probably just want to toss whatever you have the block  propped up on. You cover it with a different plastic bag that has holes in it for air to go through. We propped up ours with bamboo skewers because it is not supposed to touch the block of growing material. The whole thing gets misted two times a day, the growing material and the inside of the plastic. The environment is supposed to stay moist, like a little fungus terrarium.

We only set it up about two days ago and the first mushrooms are already sprouting. The whole block is covered in a white fuzz. I am pretty fascinated by this whole thing. Nerd alert! – Fungus was one of my favorite things to study in college…


20120921-172557.jpg

I would like to try to DIY this if I could get the mushroom spores. I think the block of growing material looks just like spent grains from when we brew beer. There’s always a lot of spent grains, so if I could use them to grow mushrooms it would be pretty awesome. I have to do more research on what would go into making my own block of growing material but I am going to try in the near future.I might just have some giant portabellas growing on the counter.

Another really cool thing about this mushroom growing kit is that it will produce about three bunches for mushrooms on this block. Once it seems to not be producing any more you could spread it on a small area of your yard. The mushrooms will grow there if the conditions are right.

I am really excited to cook something with my first batch of grown-on-my-kitchen-counter mushrooms. I’ll keep posting updates of the growing process!


Chicken of the Woods

We had a great dinner the other night with an unexpected ingredient – Chicken of the Woods mushrooms!

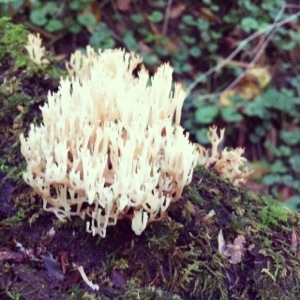
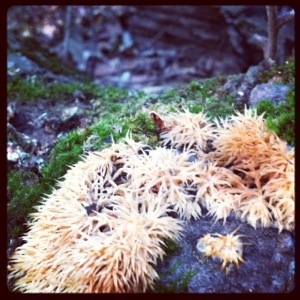
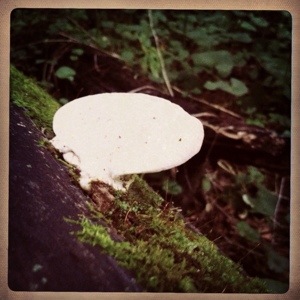
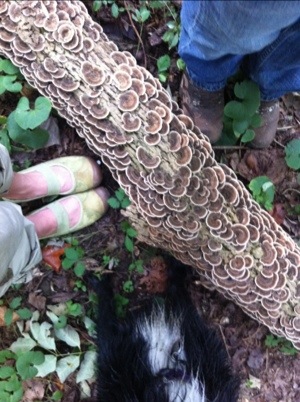
We’ve had some rainy days lately, which means mushrooms popping up all over the place. We went on a hike through some moist woods after a night of rain and there were mushrooms everywhere. It was a really nice hike with some great fungus spotting. As we hiked through the woods, we happened upon a big patch of Chicken of the Woods mushrooms. I have never eaten this type of mushroom but there are tons of recipes on the internet for them. Some consider these mushrooms a delicacy, so needless to say – I was excited to try them!

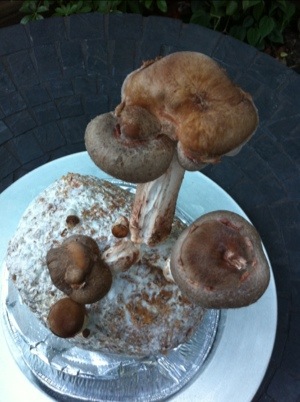
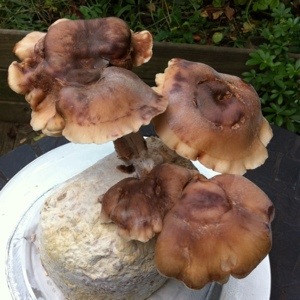
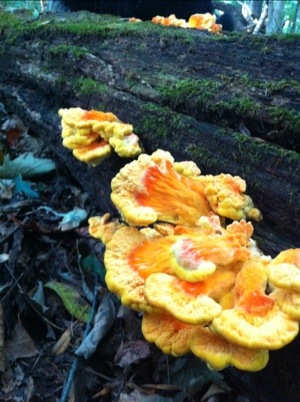
These mushrooms are vibrant and beautifully colored. They surprised us as we rounded a bend and saw the bright orange and yellow colors that stood out against the brown of the rotting log that we found them growing on. We only collected the smaller ones from the log. The smaller ones are more tender so we left the larger ones  still growing on the log. We also didn’t want to collect them all, you’ve got to leave some behind. When gathering edibles,  you always want to leave enough in the woods to reproduce so you can find them growing again.

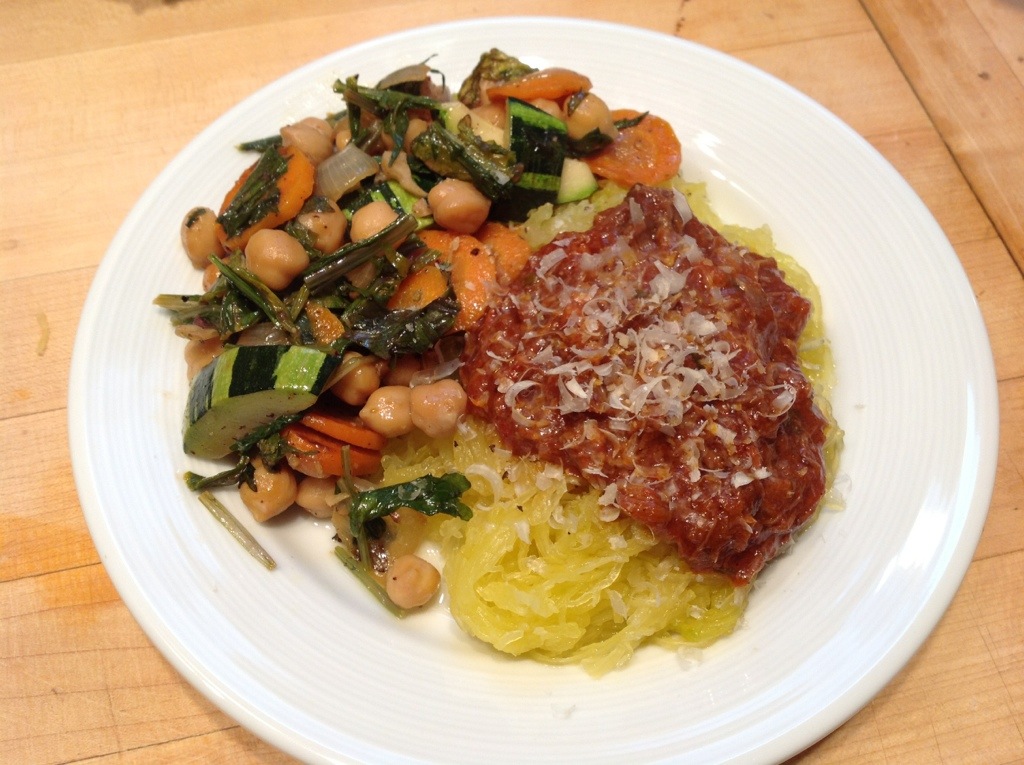
The ingredients we had this week made for a great end of summer dinner. Dan grilled us New York strip steaks on the charcoal grill and I sautéed some veggies and made a fresh salad. Here’s how we put it all together:

20120912-181326.jpg

Chicken of the Woods Mushrooms:

8 oz. Chicken of the woods mushrooms, cleaned and sliced

3 tbsp. butter

1/4 cup brandy

1/4 cup chicken stock

1 tbsp finely chopped white onion

2 tbsp. heavy cream

pinch chopped parsley

Saute the mushrooms in 1 1/2 tbsp. of butter for about 5 minutes over medium heat. Stirring occasionally and carefully – I just flipped them over in the pan.

20120912-181420.jpg

Take the pan away from the heat and pour in the brandy. Allow it to bubble and place it back on the heat when the bubbling subsides.

20120912-181432.jpg

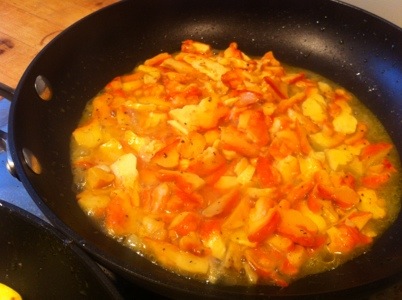
Cook the mushrooms for 5 minutes more and add in the onions and the chicken stock. Cook the mushrooms for 10 minutes more and add in the cream and parsley. Cook the mushrooms for a final three minutes, mixing in the cream.

20120912-181455.jpg

Sauteed Zucchini and Yellow Squash:

2 tbsp butter

1/2 small white onion, sliced thin

3 garlic cloves, smashed

1 tbsp olive oil

1 zucchini, sliced in to rounds

1 yellow squash, sliced into rounds

shaved parmesan cheese

Smash the garlic using a pinch of kosher salt and the side of your knife blade so that all of the oil is being released and it turns into sort of a paste.

Saute the onion in the butter over medium heat for 3 minutes, until the onion is translucent and add the smashed garlic.

Add in the zucchini and squash and saute for about 8 minutes, just until the squash starts to turn soft. I don’t cook the squash for a very long time because I really like it to still have crunch to it. Remove the squash from the pan so it doesn’t keep cooking and sprinkle with parmesan cheese.

20120912-181509.jpg

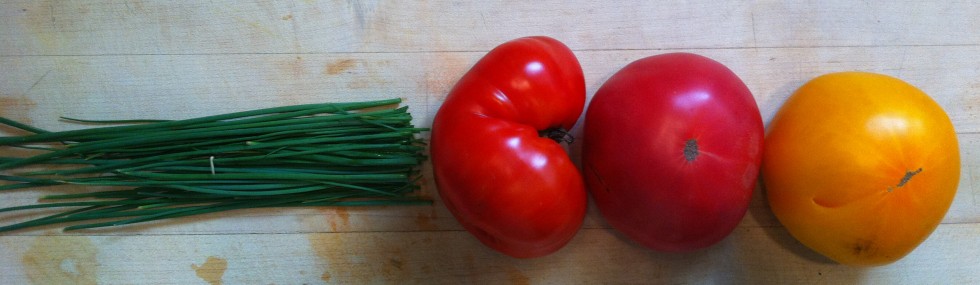
Heirloom Tomato Salad:

1/3 lb. mixed heirloom tomatoes, cut into chunks

1 medium-sized cucumber, skinned, cleaned of seeds and sliced

a few very thin slices of sweet onion

1/2 cup chopped pea shoots

1/2 cup arugula

good quality extra virgin olive oil good quality balsamic vinegar – I used the latest ones from my Global Gardens olive oil club.

salt and pepper to taste

Mix the ingredients in a bowl and serve with shaved Parmesan cheese on top.


Grilled NY Strip Steak:

2 new york strip steaks

Clarified Butter

Kosher salt and black pepper

Pat the steaks dry and sprinkle them with the salt and pepper on each side.

Rub the steaks with clarified butter to coat them.

Grill the steaks over a hot grill – we like to cook steak so it’s medium rare. It will take about 12 minutes for a 1 1/2 inch thick steak.

Make sure your grill is really hot so you get nice seared grill marks on your steaks. Place them on the grill over the hot coals and leave them alone for 5-6 minutes – don’t move them around the grill! Flip them over and cook for 5-6 minutes more. Remove the steaks from the grill and wrap in aluminum foil. Let them rest for about 5 minutes before slicing so the juices can redistribute throughout the meat.

20120912-181616.jpg

This meal was a great experience. Eating food that I have gathered myself gives me great appreciation for food that I eat. One of my favorite things is trying new foods and new recipes. It makes it really special when you know that you have found something great that you may or may not find again easily.

If you try gathering your own edibles, be sure to identify everything correctly! It is an interesting experience finding things that you didn’t know were around… or that you didn’t even know you could eat! Just be sure to leave some of the plants or other edibles where you found them so they can reproduce in that area. You always want to be able to find them again some day.

Grilled Sausages with peppers and onions

I have been trying to use the grill in new ways lately. I wanted to use the cast iron skillet over hot coals to cook something. So, I grilled some onions and peppers in a cast iron skillet to eat with grilled turkey sausages. It was a quick and easy dinner.

20120910-202519.jpg

20120910-202556.jpg

I cut up the peppers and onions and tossed them with olive oil, salt and pepper. They went into a small cast iron skillet that I heated on the grill. Once they are on the grill, make sure you turn them over a few times with the tongs or they will burn. I placed the sausages on the outer part of the grill so they cooked a little slower.

20120910-202628.jpg

The sausages stayed nice and moist and juicy on the grill. I tossed the sausages into the cast iron skillet after I removed the peppers and onions – just for a minute – to make the outside of them pick up some of the sausage and onion juices left in the skillet.

20120910-202648.jpg

20120910-202717.jpg

I made a spread with spicy brown mustard and horse-radish to spread on the buns: 2 parts mustard to one part horse-radish. Then piled bun with a sausage link and peppers and onions.

20120910-202754.jpg

20120910-202820.jpg

I would like to try to cook other foods on the cast iron skillet. I am open to ideas, so leave a comment if you have any!


In pictures: A day in Philadelphia

Yesterday we took a day trip to the City of Brotherly Love. We checked out a new space – The Porch – next to 30th Street Station, learned a little science and history at the Franklin Institute, and had a great dinner and drinks at Monk’s beer bar. It made for a great date with my new husband!

20120816-200558.jpg

20120816-200646.jpg

20120816-200719.jpg

20120816-200733.jpg

20120816-200750.jpg

20120816-200805.jpg

20120816-200820.jpg

20120816-200835.jpg

20120816-200914.jpg

20120816-200933.jpg

20120816-200949.jpg

20120816-205812.jpg

20120816-205832.jpg

20120816-205843.jpg

20120816-205854.jpg

Pizza on the Grilling Stone

I received a special grilling stone from our two chef friends (Gretchen and Aaron) for our wedding – thank you guys! This is the one that I am lucky enough to have. It is pretty versatile and you can cook a lot on it, I definitely recommend it.

We tried it out a few weeks ago and I am ready for another go at using it. It was fun but I definitely need some practice.

I made pizza dough using this recipe that I found. Pizza dough is yet another thing that I really need to practice making. This one came out ok, it didn’t rise as well as I would have liked. I need to get in to the habit of planning ahead and making my dough a little farther in advance. I often decide on a whim that I want pizza and then become a little impatient and end up not giving the dough enough time to rise because I am starving!

We heated the charcoal up and placed the stone on the grill. I had enough dough to make two pizzas. I got the dough ready by stretching and rolling it out and putting cornmeal on the bottom to keep it from sticking to the stone. I got all my ingredients ready and headed out to the grill.

We placed the dough for pizza #1 down on the stone and then tried to put all the toppings on. We covered it and waited about 10-15 minutes. That was too long! We definitely burnt our first attempt at grilled pizza. It tasted ok, but it was really burnt on the bottom…

So my next attempt was a little better. I got the dough ready for pizza #2. This time I put it right on the pizza peel so I could slide it off really fast onto the stone. I put all the toppings on it before I put it on the grill.

Here we go, pizza #2:

Roll out the dough

Fresh tomatoes


prosciutto and chopped up kalamata olives


Fresh basil


Topped with fresh mozzarella cheese and a little salt and pepper.

I carried the whole thing out to the grill and slid pizza #2 off pretty quickly, covered up the grill and waited another ten minutes.


Pizza #2 was pretty successful!

It got stuck a little bit on the stone because there were some burnt  spots from pizza #1 that I couldn’t get off. It was a great first attempt but I think next time I will do a much better job.

Improvements for next time:

  • Do not burn the first pizza or all other pizzas will get stuck.
  • Put the prosciutto on the top so it gets crispy instead of soggy.
  • Try putting the cheese under the toppings.
  • Less toppings, so they aren’t fighting against each other, the olives kind of took over this time.

I also really want to try to grill a pastry on the grill using the stone. I think I may attempt a peach tart!

Mexico Adventure 2012

We decided to venture into Mexico again for our vacation/honeymoon this year. We have been to the Yucatan together once before in 2008, and Dan traveled throughout Mexico after he graduated high school. It is a beautiful place and we’ve made some very special memories there… we are already dreaming of our next return trip. Here’s a few shots from our first time around the peninsula:

Image

Image

On our first trip, we stayed pretty close to the top of the Yucatan Peninsula. We started in Isla Mujeres and went down the coast. We visited Chichen Itza, visited the colonial town of Valladolid, and went to so many other places its hard to remember them all. I also happened to find the best tamale that I have ever eaten. It was in the town of Tulum from a cart on the town square. I planned on looking for it again during this trip… keep checking back to see if I found it.

This time we really covered some area around the peninsula and went inland to the state of Chiapas. We visited colonial cities, Mayan ruins, the jungle and the beaches. Here’s a little peek into the adventure:

We took advantage of the convenient public transportation on our first visit to Mexico. We planned to ride the buses again, but we were convinced to rent a car in Merida, the first city we spent some time in. Renting the car made for a whole different kind of adventure… and an adventure it was… Don’t worry, I took plenty of food pictures and I have lots of stories to share in the upcoming weeks!

Sandwich Wednesday: Prosciutto Caprese

I enjoyed a sandwich last Wednesday with one of my friends (Dan Z) who also has summer afternoons free. This summery sandwich was made with Washington Boro tomatoes that I bought at the tomato festival. I got the rest of the ingredients at Mandro’s Imported Foods. They have a great selection of meats and cheeses. I got a frozen baguette made by Slow Rise Bakery (they carry it at Mandro’s). These baguettes are baked, froze, and then placed in your oven for 5-10 minutes. They taste like they are freshly baked right out of your oven in your home! And they get nice and crispy, but not too hard. They are perfect for sandwiches because you can bite through them easily. I hate when I get bread that is hard to bite into… then all of your sandwich fixin’s squeeze out of sandwich… you know what I mean… bummer.

To build this sandwich, I started with the warm toasty baguette and drizzled good olive oil and fig balsamic vinegar from Global Gardens over the inside. I laid two slices of very thinly sliced prosciutto down – don’t over do it, two is plenty. Top that with sliced fresh mozzarella, fresh basil, sliced summer tomatoes, salt and pepper, and cover it with the top of the baguette. Simple and delicious. A perfect summer sandwich.