Ethiopian dinner

I have been craving lentils lately. I ordered them a few times from a new restaurant that opened up in downtown Lancaster called Himalayan Curry and Grill. I have also eaten them at an Ethiopian restaurant and grocery called Addisu. They were delicious both places but I just can’t keep ordering take out!

I decided to try making the Ethiopian version at home. I read a bunch of recipes from around the internet and decided to try this one. I modified it a little bit based on what I had at home and the lentils came out amazing! I also made a chicken dish and vegetable side. I used most of the same ingredients in the chicken as the lentils. So if some of the quantities seem a little funny, it’s because I split them to make two dishes.

I mixed my own Berbere seasoning from this recipe also. I didn’t think this version was particularly spicy. My husband bought some right from the Ethiopian restaurant and grocery store. I ended up adding extra to my dishes because they didn’t really have that much spicy heat to them. You can adjust how much you add to your dishes depending on how much spice you like.

Ethiopian Red Lentils (Yemisir Wot)20130306-203102.jpg

3/4 of a large red onion, diced small

1/2 Serrano chile, minced

1 hungarian hot wax pepper, minced

4 cloves garlic, minced

1 inch piece ginger, minced

1 tbsp butter

1 tbsp olive oil

2 tbsp. Berbere seasoning (from this recipe)

1 tbsp. turmeric

1 1/2  15 oz.  cans crushed fire roasted tomatoes

1 cup coconut milk

2 cups chicken or vegetable stock (plus a little more as needed)

2 cups split red lentils

Heat the butter and olive oil in a deep cast iron pot and saute the onions, peppers, garlic and ginger for 5 minutes – salt and pepper to taste. Add in the spices and saute another 2-3 minutes until fragrant. Add in the tomatoes, coconut milk, and 2 cups of stock. Bring to a simmer and add in the lentils, then bring to a boil. Stir the lentils, cover and turn the heat down to low. Stir every ten minutes to keep the lentils from sticking to the bottom of the pot. Cook for 40 minutes or until the lentils are tender. If the lentils appear to be drying out, add stock a little at a time when you stir the lentils.

Chicken Dish – I have no idea what to name this!20130306-203121.jpg

The picture above shows the chicken before I broke it up. If you want to eat the chicken in pieces you can. It is still really good! But you won’t be able to pick it up with the Injera.

4 chicken thighs

pan searing flour (I use Wegman’s brand or you can make a mix of flour, salt and pepper)

1 tbsp. butter

1 tbsp. olive oil

1/4 of a large red onion, diced small

1/2 Serrano chile, minced

1 Hungarian hot wax pepper, minced

4 cloves garlic, minced

1 inch piece ginger, minced

2 tbsp. Berbere seasoning (from this recipe)

1 tbsp. turmeric

1/2 can crushed fire roasted tomatoes (from the 15 oz. cans used in the lentils)

about 1 cup coconut milk

1 cup chicken or vegetable stock

Dredge the chicken in the pan searing flour. Sear both sides of the chicken thighs in the oil and butter in a low cast iron pan with a lid. Remove the chicken and saute the onions, garlic, peppers, and ginger – add salt and pepper to taste. Add the seasonings and saute until fragrant. Add the tomatoes, coconut milk and stock. Nestle the chicken thighs back into the pan, submerged under the sauce. Bring to a boil, cover, and place in the oven at 400 degrees for 45 minutes. The chicken will come out falling off the bone! When you remove the pot from the oven, remove the chicken thighs and pull the chicken off the bones. Chop the chicken in to bite size pieces and place them back in the sauce. I added about a teaspoon of the Berbere from the restaurant to this to give it a little more spice. Here’s what it looks like:

20130306-204034.jpg

Ethiopian veggies: Cabbage and carrots
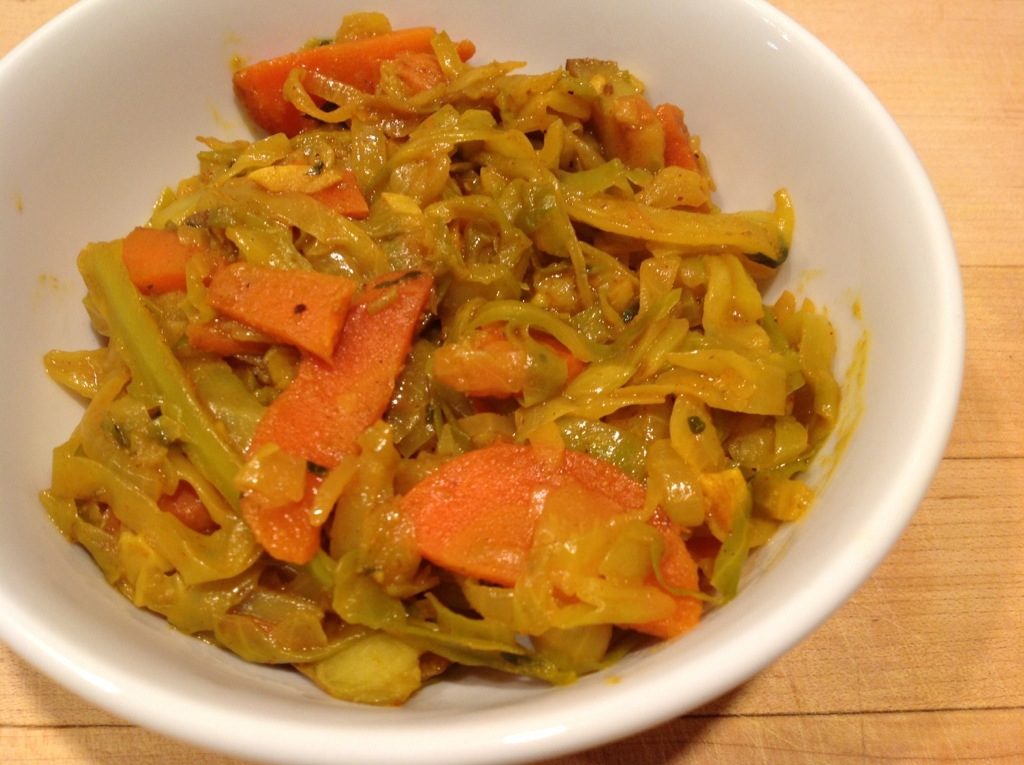
20130306-204047.jpg

1 tbsp. olive oil

1/2 head shredded green cabbage

2 carrots

1/2 Spanish onion, sliced thin

3 garlic cloves

1 tsp ginger, minced

1 tbsp. turmeric

1 tbsp. cumin

1/4 cup of chicken or vegetable stock

Saute the onions, ginger, and garlic in the olive oil. Add in the spices and saute until fragrant. Add in the carrots and cabbage, salt and pepper to taste, and the 1/4 cup of stock and saute. Cover and stir every few minutes until soft. I ended up adding a little of the Berbere from the restaurant to this to give it a little kick.

Here it is all put together. I served it on top of Injera, just like at the Ethiopian restaurant and we ate it with our hands!

20130306-203147.jpg

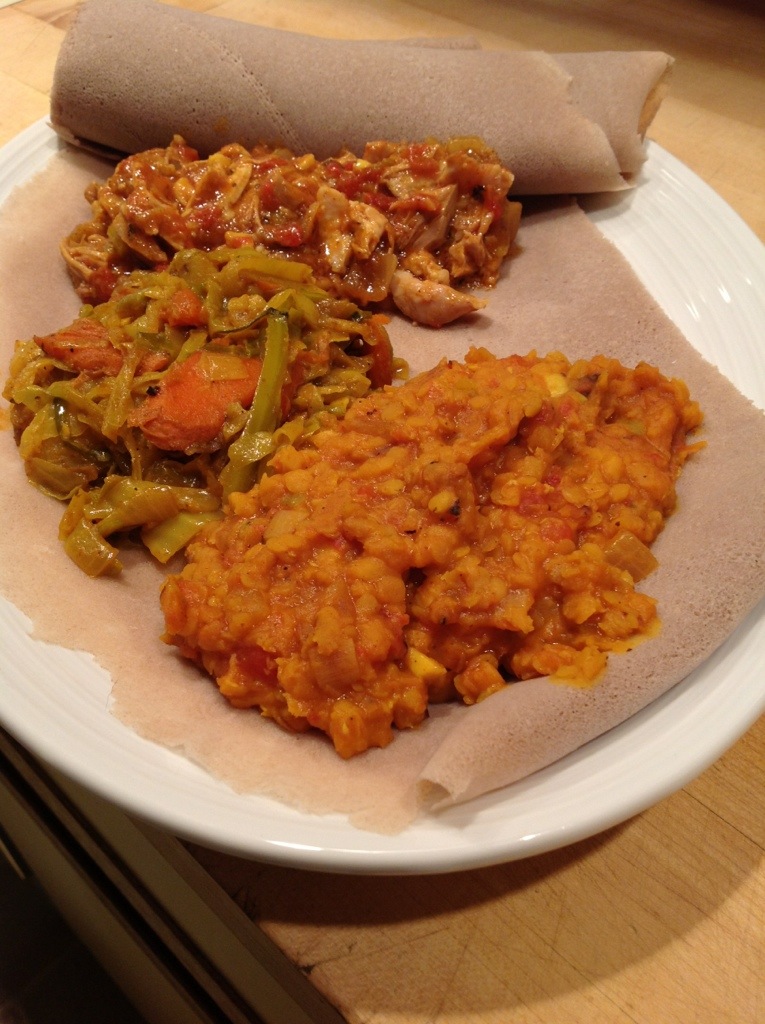
I would like to try to make the Injera by myself. We got this one from the Ethiopian restaurant. They sell almost all of the ingredients that you need to make their food and the equipment you need as well. They have the pan to make Injera but it comes with a hefty price tag and I just don’t think I would use it that much. I did have the idea today to try to make it in my crepe pan! So for next time, I’ll try to do it myself. I think I am going to try to use this recipe. I’ll let you know how the crepe pan works.

Advertisement

Braising Meats

I received a very pretty bright red braising pan from my friends Loretta and Jenny at my tea party bridal shower earlier this year.

IMG_0105

It is made of heavy cast iron with enamel coating. The bright red exterior is complimented by a cream-colored interior. The light-colored inside allows you to see your food cooking and browning on the bottom. You can get this same one at Target. It’s good quality, it’s pretty, and it doesn’t cost an arm and a leg! I also have a cast iron dutch oven that I use to braise larger pieces of meat that my husband bought me years ago for Christmas. These heavy cast iron pans will last you a life time if you take care of them. There are so many options, and so many varying prices. You don’t have to buy the most expensive one, but I do think it is important to get one with the cream-colored inside so you can see the food you are cooking!

IMG_0107

I have been using this pan a lot lately especially since it started getting chilly outside. One thing that I have been making quite often is braised chicken. I have seemed to achieve perfection when I make chicken this way…. It always comes out sooooo juicy and falls right off the bone. You can make a simple dinner from it with some steamed veggies or you can pull it off the bones and use it in all kind of dishes.

I like to make chicken thighs because I love the dark meat but I have used breasts and even a whole chicken. I buy the bone-in, skin-on chicken and it should be cut into pieces if you’re going to cook a whole bird.

Start by heating the pan over medium-high heat and adding olive oil or butter (or both). Salt and pepper the chicken on both sides and place it in the hot pan skin side down. Leave it alone so the skin sears and becomes brown and crispy. You’ll know when it is ready to turn when it releases from the pan without resistance. Don’t pull the chicken or try to get it unstuck before this point, you’ll just end up pulling the skin off.

IMG_0098

Flip the chicken over and let it cook on the other side for the same amount of time, until the chicken releases from the pan by itself, don’t force it.

Add in cut up garlic and onions (or whatever other veggies and herbs you want) to the pan and just saute them for about a minute.

Add in chicken stock until it covers about half of the chicken (usually about two cups). You should be able see the top of it above the broth.

IMG_0099

Bring it up to a bubble and then cover it. Turn the heat down to low and let it simmer for about an hour. You can also move the pan into the oven at this point and let it bake at 350 degrees for about an hour. You’ll get pretty much the same result.

If I have large pieces of chicken, I usually put it in the oven. If I am just making a few chicken thighs, I leave it on the stove.

Here’s what happens when it is done…

IMG_0101

You can touch it with a utensil and it will just melt apart!

Mmmmm…

You can save the braising liquid to make gravy by adding it to a roux or you can use it in soup. It is packed with a lot of flavor. The onions and garlic become super soft and pretty much just fall apart. You can strain it if you want but I usually just leave the aromatics in it and use the liquid as is.

Here’s a few simple dinners I made:

IMG_0103

Braised chicken with mashed sweet potatoes and steamed broccoli.

IMG_0114

Chicken braised with leeks and white wine added to the braising liquid, sauted mustard greens and broccoli.

This chicken meat is also great to add to soups and noodle bowls, added to pasta dishes, and it is delicious in chicken salad for sandwiches.

I have made several other meats using this method. The cooking time varies but it is the same basic process. Here’s a few more examples…

Braised Short Ribs and Root Veggies:

IMG_8615

Dredge the short ribs in flour, salt and pepper and sear on all sides. Add carrots (unpeeled), garlic, onion, and rosemary to the pot and saute for one minute. Use a stout beer as your braising liquid, I used root beer stout home-brewed by a good friend of mine. Add in some beef stock to bring the liquid about up to the top of the meat (about 1 cup). Bring everything up to a bubble, close the lid, and place in the oven at 350 degrees for 2-3 hours (depending on how large your short ribs are). You can check them by pressing on the meat with a utensil. If the meat starts to separate then they are done. The fat in the short ribs with render and they will fall apart and melt in your mouth! The carrots will hold their shape if you leave the skins on, just clean them well.

You can make gravy with this braising liquid or just spoon it right over the meat when you serve it. I served mine atop mashed parsnips.

IMG_8620

Ginger Braised Pork:

I used a pretty big pork roast for this – about 4.5 lbs. I had to cook this in my larger dutch oven.

IMG_0012

Sear the meat on all sides.

IMG_0013

Add in onions, garlic, and two apples (skinned and diced) and saute for about a minute. Add in a bottle of ginger beer – I used a home-brew again made by a friend. You can find ginger beers in some fancy bottle shops or you can substitute with any kind of fall beer or lager. I think it’s important to note that I used beer flavored with ginger, I did not use the ginger beer that is like ginger ale soda- I’m not really sure how that would turn out… probably too sweet but who knows! Leave me a comment if you try it!

IMG_0014

I used vegetable stock to bring the liquid level up higher – about half way up the roast. Let it come up to a bubble and cover it with the lid. Place it in the oven at 350 degrees for about 3 hours.

You’ll be able to tell it is done by pulling at it with a pair of tongs. If the meat pulls apart easily, it’s done. If it doesn’t pull apart, just put it back in the oven and check it periodically.

IMG_0019

Once again, you can make gravy with the braising liquid or just use it as-is. I served this pork with roasted mixed fall veggies and rice. I added it to my version of an Asian noodle bowl with bok choy, rice noodles, and ginger flavored broth. I also made a stuffed squash with a mixture of pork, mushrooms, rice, and cheese.

Braising does take time, but if you make more than you need for one meal, you can freeze it. I have made so many dishes using the meat that I braised and saved in the freezer. Just portion out about 1 cup per freezer bag. If you add a little of the braising liquid to the bag that you freeze it in, the meat will still be moist when you defrost it. Check back for upcoming recipes and ideas for using the braised meats – I have a lot!

Spring Grilling Tips, Perfect Chicken and Smokey Veggies

It has been incredibly lovely outside in Lancaster!  On Tuesday I walked home from work without a coat and I decided it was time to clean out the grill and make something smokey.

I had chicken legs and thighs in the refrigerator that I had planned to bake in the oven, but I decided to prepare them for grilling as soon as I got home. I would normally marinate them overnight but I only had an hour and I really wanted to be outside using the grill. I cleaned up my 6 bone-in, skin-on chicken legs and thighs, rubbed them with salt and pepper and placed them in a zip-top bag with 1/4 cup of Garlic Expressions vinaigrette and 1/4 cup of olive oil.

While the chicken was marinating, I cleaned up the grill and got my charcoal heated up. I like to use a charcoal grill so much that I got rid of my propane gas grill when we moved a few years ago. I have a simple Weber One-Touch and some of their accessories. A lot of people think it is too much work to get the coals lit and ready, but if you get one of these contraptions it makes your charcoal heat up pretty quickly.

It’s called a chimney starter. You stuff the bottom with a piece of newspaper (or fire starters) and light it. The cylinder shape shoots the flames up into the coals like…yes… a chimney! I’ll share my secret for getting the coals to light even faster: Twist up a piece of newspaper so it looks like a wick to a candle. Place the wick in the center of the starter standing up and surround it with your coals… like the wick of a candle. You can light the newspaper on the bottom and the top and your coals will catch fire even quicker… if you are really the impatient type.

While the chicken is marinating and you have the grill coals heating up… get your veggies ready!

I am using a medium size sweet spanish onion cut into large chunks, a box of frozen artichoke hearts (thawed), and about a pound of mini sweet peppers. The peppers can go right on the grill, they are large enough that they won’t fall through the grates but I put the onions and artichokes on bamboo skewers so they won’t get lots through the grates. Drizzle all of your veggies with the same garlic vinaigrette as we marinated the chicken with and olive oil and sprinkle with salt and pepper. Ready to grill!

I have spent a lot of time perfecting the way I cook chicken. Chicken is such a staple… it’s cheap, it’s readily available, and if it s cooked bad, it’s can make your dinner a disaster… if it’s cooked good, it can make you a star chef! Here’s how I set up the grill to get juicy, perfectly grilled chicken. It takes a little longer but it is so worth it.

Put your hot coals on one side of the lower grill grate and add enough extra briquettes to last you about 1 hour of cooking time. Place an aluminum foil pan on the other side. You can buy disposable ones at the grocery store or you can just make your own out of two sheets of heavy-duty aluminum foil. Make sure the sides of your pan are at least 2 inches high, you are going to want it to hold about a 1/2 gallon of water. Fit your pan in next to the coals and pour in the water. Here’s what my set up looks like:

Replace the upper grill grate and put the lid on the grill with the vents open. Allow the grill to heat up for a few minutes. Then remove the lid so that you can clean the upper grate. I like to use a triangular wire grill brush. It easily scrapes away anything on your grate. Make sure you heat up the grill grate before scraping, it makes it a lot easier to clean.

Take your chicken out of the zip top bag and place it on the side of the grill above the water pan (skin side up). Reserve the rest of the marinade in the bag for when you flip the chicken. Cover the grill and allow the chicken to cook for about 20 minutes. Here’s what it looks like after about 20 minutes:

Flip the chicken over (skin side down now) and brush some of the marinade onto the pieces. Look at the grill marks that are starting to form!

Cover the grill again and allow the chicken to cook for another 20 minutes.  Use a thermometer to check the temperature of your chicken, the thermometer should read 160-165 degrees F. Flip the chicken over (skin side up) onto the other side of the grill (right over the hot coals). Only leave the chicken there for a few minutes and repeat on the other side. This will crisp up the skin but be sure to watch it because it will burn quickly!

Remove the chicken and place it onto a piece of aluminum foil. Wrap the chicken and let it rest until you have grilled your veggies.

You can start the veggies while you are crisping the skin on the chicken. Here’s a grill full of deliciousness!

Place the veggies on the side of the grill over the water pan and cover for about ten minutes. The veggies will get warm and a little softer without getting burned on the outside. Remove the cover and place the veggies over the hot coals for a few minutes on each side, just to get a little char around the outside.

Remove the veggies and place them onto a platter. You can serve everything family style but I like to create a plate for each person.

Serve the chicken and veggies with a nice salad topped with this vinaigrette: 2 tsp. fresh lemon juice, 2 tsp. of the garlic vinaigrette that was used for the marinade, 2 tbsp. extra virgin olive oil and salt and pepper to taste. My salad included baby spinach, baby pea tendrils, mustard greens, and shredded romaine lettuce.

I like to make a little extra dressing and toss the artichokes in it because they can get a little dry on the grill. Pile everything onto your plate and enjoy. The colors really look lovely together, don’t you think?

A perfect grilled dinner on a beautiful day! We paired this dinner with a cool Nugget Nectar from Troegs Brewing Company and ate out on the back deck, here’s to an early start to spring!

P.S – Check out what I’m doing with the left overs in my next post!

Chicken Soup

I have been so busy lately… I just got a new job!

I am still teaching middle school science but I switched the school where I am teaching. It’s only two blocks away from my house, so I really like the short walk in the morning. Moving in the middle of the year was pretty challenging and it kept me working late for a while. I had a lot of packing up, moving boxes, and setting up a new classroom.

Right in the middle of this busy time, I started to not feel so well. Not sure if I was trying to do too much or if it is the crazy warm and cold January weather, but I was wiped out! When I don’t feel good, no matter how tired I am, I usually end up making a big healthy dose of chicken soup.

Here’s my chicken soup recipe that always makes me feel better:

1 tbsp. olive oil

3-4 ribs of celery, from the heart with the leaves attached

2 carrots, peeled

1/2 of a medium onion

2 cloves garlic

8 oz. cremini mushrooms

1 cup shredded chicken from a rotisserie chicken

8 cups chicken stock

1/2 cup ditalini pasta or cut spaghetti pasta

handful of Italian flat leaf parsley

Cut the celery into small pieces and slice the carrots into rounds and chop the onion and mince the garlic. Add the olive oil and vegetables to a pot heated over medium heat. Saute the vegetables until they begin to become soft and add the sliced mushrooms. Saute for about 5 minutes more until all the veggies are soft.

Add the chicken stock and shredded chicken and bring to a boil. Add in the pasta and stir occasionally until the pasta has cooked (about 7 minutes). Chop the flat leaf parsley and add it to the soup.

Sometimes, if I have it in the refrigerator, I like to add some fennel fronds to give the soup some extra flavor.

This soup is pretty quick and easy. You can make it in no time if you have everything on hand. Using the rotisserie chicken is a big time saver and it adds great flavor. I buy rotisserie chickens quite frequently because there are so many things you can make with them. I usually use part of the meat for a recipe that night and freeze the rest in 1 cup portions in zip-top bags. It thaws fast and it is really convenient if you are in a hurry. I’ll be adding more of my rotisserie chicken ideas this year!

Leftovers! Couscous

I asked Dan to take chicken out of the freezer during the day so it could defrost by the time I got home from work. I wanted to make barbecue chicken on the grill but that required a bunch of pieces of bone-in chicken thighs and legs. Dan only took out two small boneless skinless chicken thighs. Oops, I probably should have been more specific about the chicken…

So what was I going to make for dinner now?

I had about 1 1/2 cups of cooked couscous left over from my summer fish in a pouch.

I also had some nice big peppers from market. They are in season right now and they are really cheap! I decided to make stuffed peppers with chicken and couscous filling.

Here how to do it:

Couscous Stuffed Peppers

1 1/2 – 2 cups cooked couscous (I used my lemon parsley left over couscous but you could use any kind you have)

1 medium yellow squash

1/2 small red onion, chopped

2 garlic cloves, minced

1 cup chicken stock

4 plum tomatoes, chopped

2 boneless skinless chicken thighs

handful of basil leaves, chopped

4 large peppers (any color)

Cut the tops off the peppers, remove the seeds and place them in a 9×9 inch baking dish.

Season the chicken thighs with salt and pepper on both sides. Coat a deep saute pan with olive oil and saute the chicken thighs until a nice golden crust forms – don’t remove all of the excess fat from the thighs, you want a little bit to render in the pan to give it a deeper flavor.

Saute the onion and garlic with the chicken for about two minutes. Add 1/2 cup of chicken stock to the pan – the chicken stock will help you deglaze the pan – so scrape up all those good little brown bits, they have lots of flavor in them!

Add the tomatoes into the pan, season with salt and pepper and cover. Bring the mixture up to a bubble and cook over medium heat for about 5 minutes. Pull out the chicken thighs and shred them.

Small dice your yellow squash and mix it into the left over couscous. Make sure you break up the couscous because sometimes is gets clumped together in the refrigerator.

Mix the chicken, basil, and the tomato mixture into the couscous. divide the mixture and spoon it into each of the peppers. You may have to push down and mound it in the peppers. Use it all! It’s ok if the peppers are overflowing.

Pour the other 1/2 cup chicken stock into the bottom of the baking dish. Drizzle some extra virgin olive oil over the tops of the mounds of couscous. Cover the dish with aluminum foil and bake at 350 degrees for 30 minutes.

The couscous filling won’t look that much different once it is baked, but the peppers will be soft and juicy. The chicken stock that we added to the bottom of the dish before baking keeps everything nice and moist.

This is a great all in one dinner, no sides needed… and you used your leftovers!