Central Market: some new stands for 2013!

There’s some new stands popping up at the Lancaster Central Market  this year. I thought I spread the word about a few…

20130205-224921.jpg

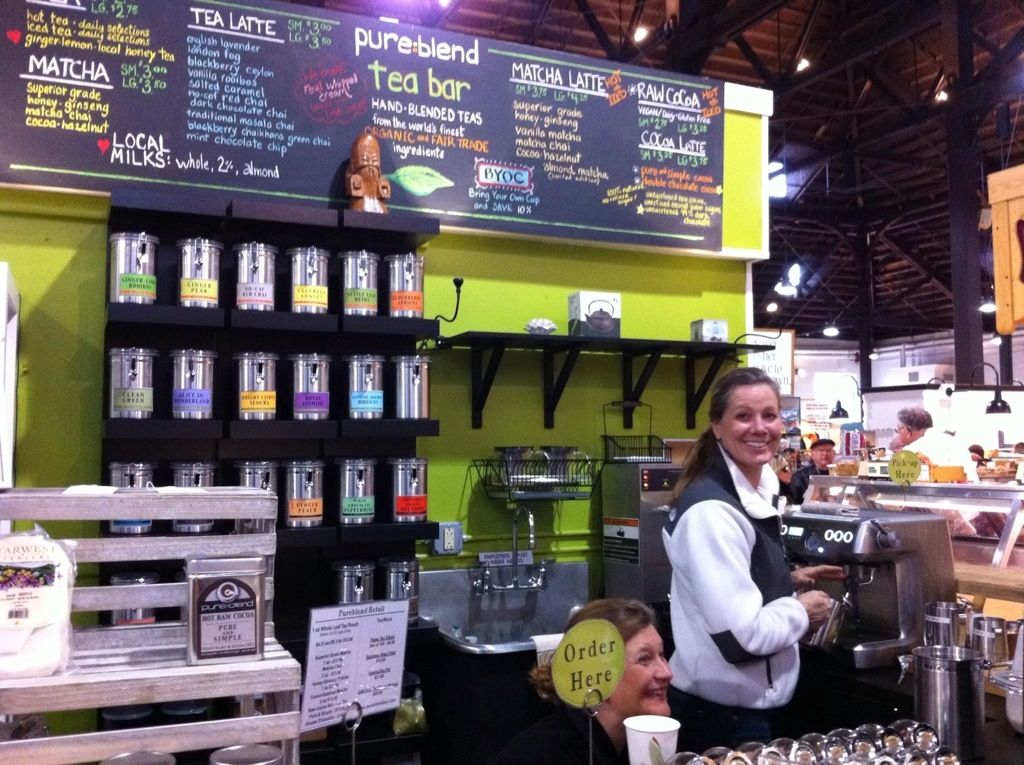
Pureblend Tea serves up specialty tea lattes and Matcha – all organic. I’ve had two tea lattes so far and they were both really good! I tried the blackberry chaikhana and the chocolate chai latte. I liked the teas, just one heads up – some of the lattes have flavor syrup in them. My blackberry tea had blackberry syrup – which wasn’t bad – I was just expecting blackberries in with the tea leaves. Sometimes the syrups are a little too sweet for me. The chocolate chai was yummy, it only had a hint of chocolate right in with the tea leaves. I did decline the square of organic dark chocolate that could have been added to it. I am sure it is good however you order – like a hot chocolate chai.

I am really excited for the opening of Oasis. I saw a sign on a corner stand (that used to be Senorita Burrita) advertising their opening. They will have organic dairy products. I have recently switched over to organic milk instead of drinking soy milk all the time. I’m sure this stand will help me with that.

Also new for 2013 – I am trying really hard not to shop at big grocery stores. I am only allowing myself one visit a month to a chain grocery store like Giant. My husband has gone on a little health kick and has changed his diet – I am following suit. Mostly our switches are to organic dairy products, different types of sugars, cutting out the white flour (I haven’t cut the pasta yet), and making sure we are getting plenty of veggies. I am also trying to buy as local as I can this year. I think that we eat pretty healthy already so it hasn’t been to hard – So far it is going very well. I am definitely cutting down the grocery bill, mostly because I am not buying a bunch of unnecessary items at the grocery store.

But back to Market…

20130205-224949.jpg

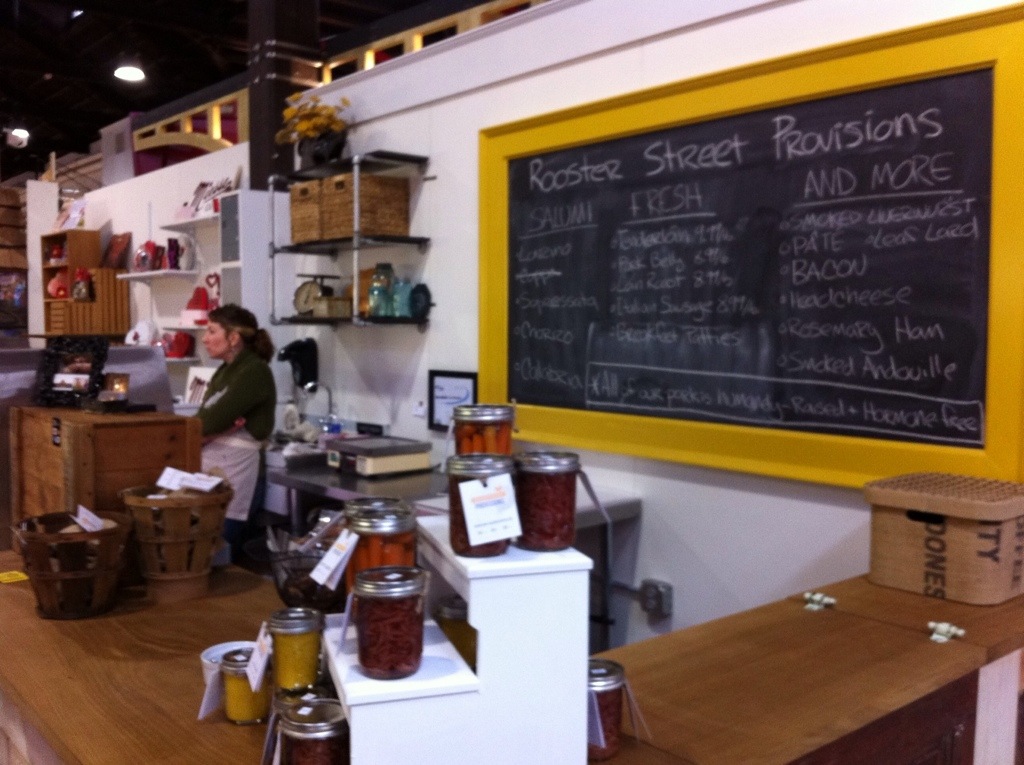
Rooster Street Provisions specializes in awesome pork products!!! I got their italian sausage this past saturday. I added it to some homemade sauce and poured it over pasta. I loved it! it is worth all these exclamation points!! I can not wait to go back and try some of their other cured meats. I’ll visit them on saturday and pick out something else extra special to snack on. If you want to see some pretty pics of their products – check out their instagram page @roosterst. I also love their yellow framed chalkboard and wooden counters at their stand. Beautifully done!

On the other side of Rooster Street Provisions is…

20130205-224934.jpg

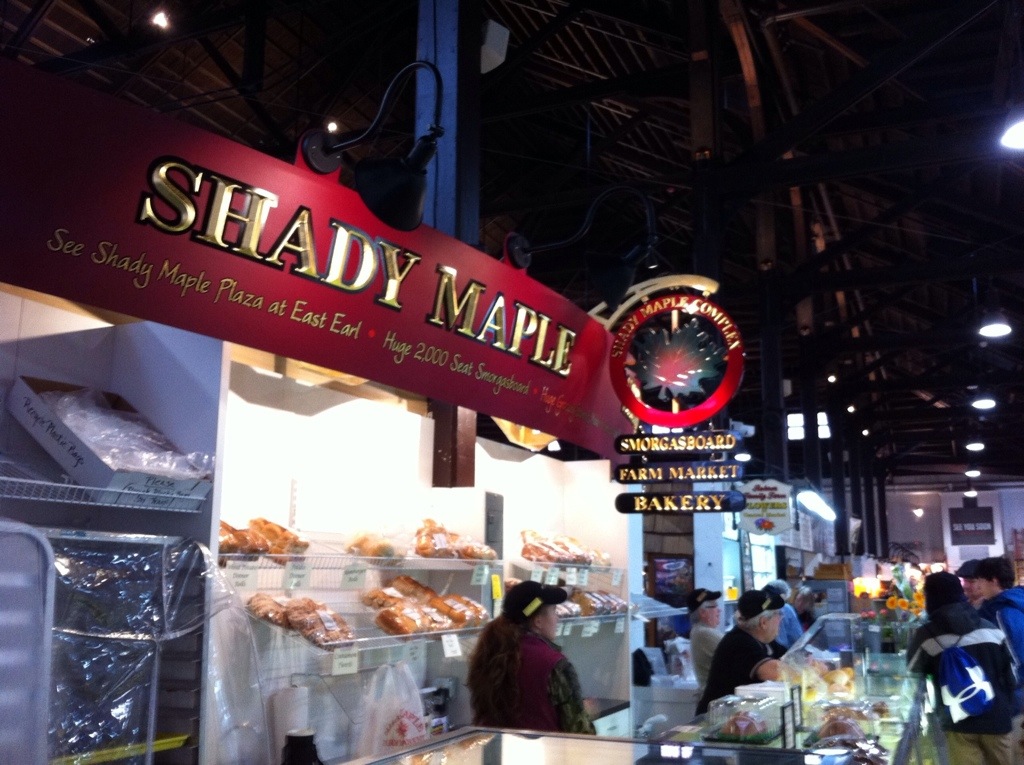
Shady Maple – chock-full of baked goods. I haven’t tried anything from here yet… I just noticed that their new sign is huge! What a contrast to the Rooster Street stand. Everyone loves a little variety, right?

20130205-224959.jpg

I did pick up a lonely looking cupcake at Wendy Jo’s. This stand has been at market for a while and it continues to be delicious.

Right next to Wendy Jo’s is a food stand called Comfort Bakehouse. They make all kinds of foods from meatloaf to eggs… all in muffin tins! All of their offerings look quite tasty. I’m going to give them a try this week. I’ll have to decide between breakfast or lunch… or maybe I’ll just get both!

I’ve tried Thom’s bread a few times now. They make a pretty solid loaf of bread – actually it is pretty crispy and fresh, not quite solid. The rosemary has been my favorite – but get there early – they have been sold out the last two weekends that I went to market. I have also enjoyed the kalamata olive – we had it with some delicious pasta last weekend. It’s perfect for dipping into sunday sauce.

20130205-225017.jpg

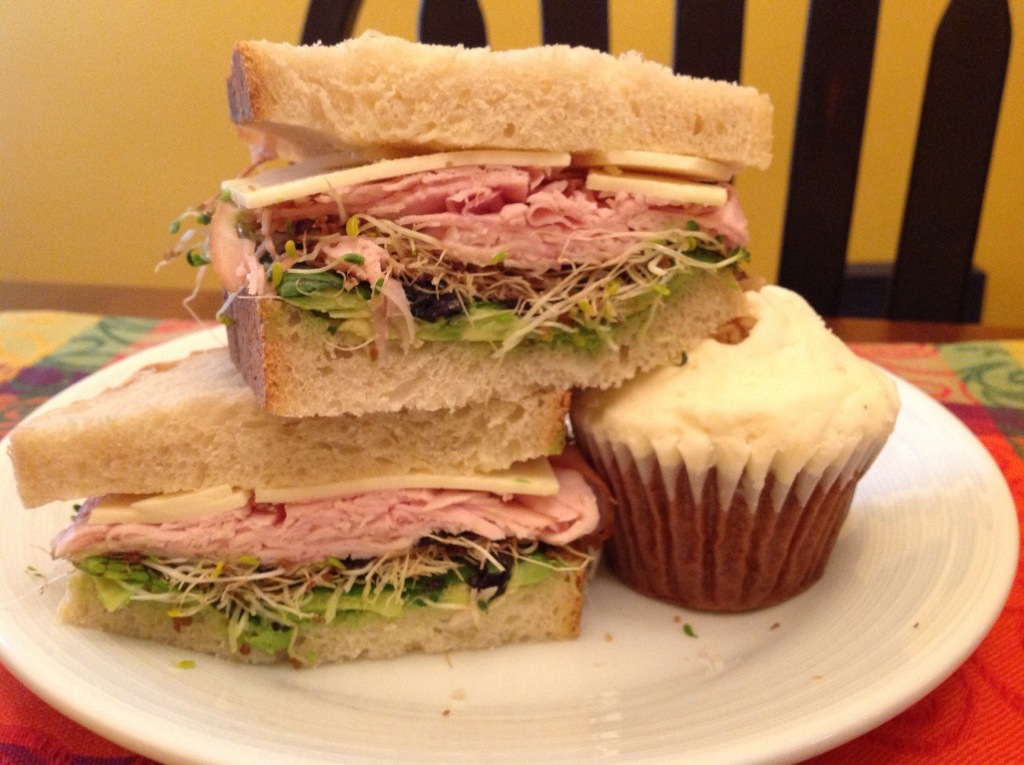
I made this super sandwich with a Rustic Italian boule from Thom’s on Saturday. Everything else on this sandwich was also from market – avocado, alfalfa sprouts, mustard greens, smokey turkey and sharp cheddar cheese. If you didn’t notice… there’s my carrot cupcake… it was scrumptious and I enjoyed it very much… I ate all of it!

Remember Central Market is open Tuesdays, Fridays, and Saturdays! Hope to see you there!

Braising Meats

I received a very pretty bright red braising pan from my friends Loretta and Jenny at my tea party bridal shower earlier this year.

IMG_0105

It is made of heavy cast iron with enamel coating. The bright red exterior is complimented by a cream-colored interior. The light-colored inside allows you to see your food cooking and browning on the bottom. You can get this same one at Target. It’s good quality, it’s pretty, and it doesn’t cost an arm and a leg! I also have a cast iron dutch oven that I use to braise larger pieces of meat that my husband bought me years ago for Christmas. These heavy cast iron pans will last you a life time if you take care of them. There are so many options, and so many varying prices. You don’t have to buy the most expensive one, but I do think it is important to get one with the cream-colored inside so you can see the food you are cooking!

IMG_0107

I have been using this pan a lot lately especially since it started getting chilly outside. One thing that I have been making quite often is braised chicken. I have seemed to achieve perfection when I make chicken this way…. It always comes out sooooo juicy and falls right off the bone. You can make a simple dinner from it with some steamed veggies or you can pull it off the bones and use it in all kind of dishes.

I like to make chicken thighs because I love the dark meat but I have used breasts and even a whole chicken. I buy the bone-in, skin-on chicken and it should be cut into pieces if you’re going to cook a whole bird.

Start by heating the pan over medium-high heat and adding olive oil or butter (or both). Salt and pepper the chicken on both sides and place it in the hot pan skin side down. Leave it alone so the skin sears and becomes brown and crispy. You’ll know when it is ready to turn when it releases from the pan without resistance. Don’t pull the chicken or try to get it unstuck before this point, you’ll just end up pulling the skin off.

IMG_0098

Flip the chicken over and let it cook on the other side for the same amount of time, until the chicken releases from the pan by itself, don’t force it.

Add in cut up garlic and onions (or whatever other veggies and herbs you want) to the pan and just saute them for about a minute.

Add in chicken stock until it covers about half of the chicken (usually about two cups). You should be able see the top of it above the broth.

IMG_0099

Bring it up to a bubble and then cover it. Turn the heat down to low and let it simmer for about an hour. You can also move the pan into the oven at this point and let it bake at 350 degrees for about an hour. You’ll get pretty much the same result.

If I have large pieces of chicken, I usually put it in the oven. If I am just making a few chicken thighs, I leave it on the stove.

Here’s what happens when it is done…

IMG_0101

You can touch it with a utensil and it will just melt apart!

Mmmmm…

You can save the braising liquid to make gravy by adding it to a roux or you can use it in soup. It is packed with a lot of flavor. The onions and garlic become super soft and pretty much just fall apart. You can strain it if you want but I usually just leave the aromatics in it and use the liquid as is.

Here’s a few simple dinners I made:

IMG_0103

Braised chicken with mashed sweet potatoes and steamed broccoli.

IMG_0114

Chicken braised with leeks and white wine added to the braising liquid, sauted mustard greens and broccoli.

This chicken meat is also great to add to soups and noodle bowls, added to pasta dishes, and it is delicious in chicken salad for sandwiches.

I have made several other meats using this method. The cooking time varies but it is the same basic process. Here’s a few more examples…

Braised Short Ribs and Root Veggies:

IMG_8615

Dredge the short ribs in flour, salt and pepper and sear on all sides. Add carrots (unpeeled), garlic, onion, and rosemary to the pot and saute for one minute. Use a stout beer as your braising liquid, I used root beer stout home-brewed by a good friend of mine. Add in some beef stock to bring the liquid about up to the top of the meat (about 1 cup). Bring everything up to a bubble, close the lid, and place in the oven at 350 degrees for 2-3 hours (depending on how large your short ribs are). You can check them by pressing on the meat with a utensil. If the meat starts to separate then they are done. The fat in the short ribs with render and they will fall apart and melt in your mouth! The carrots will hold their shape if you leave the skins on, just clean them well.

You can make gravy with this braising liquid or just spoon it right over the meat when you serve it. I served mine atop mashed parsnips.

IMG_8620

Ginger Braised Pork:

I used a pretty big pork roast for this – about 4.5 lbs. I had to cook this in my larger dutch oven.

IMG_0012

Sear the meat on all sides.

IMG_0013

Add in onions, garlic, and two apples (skinned and diced) and saute for about a minute. Add in a bottle of ginger beer – I used a home-brew again made by a friend. You can find ginger beers in some fancy bottle shops or you can substitute with any kind of fall beer or lager. I think it’s important to note that I used beer flavored with ginger, I did not use the ginger beer that is like ginger ale soda- I’m not really sure how that would turn out… probably too sweet but who knows! Leave me a comment if you try it!

IMG_0014

I used vegetable stock to bring the liquid level up higher – about half way up the roast. Let it come up to a bubble and cover it with the lid. Place it in the oven at 350 degrees for about 3 hours.

You’ll be able to tell it is done by pulling at it with a pair of tongs. If the meat pulls apart easily, it’s done. If it doesn’t pull apart, just put it back in the oven and check it periodically.

IMG_0019

Once again, you can make gravy with the braising liquid or just use it as-is. I served this pork with roasted mixed fall veggies and rice. I added it to my version of an Asian noodle bowl with bok choy, rice noodles, and ginger flavored broth. I also made a stuffed squash with a mixture of pork, mushrooms, rice, and cheese.

Braising does take time, but if you make more than you need for one meal, you can freeze it. I have made so many dishes using the meat that I braised and saved in the freezer. Just portion out about 1 cup per freezer bag. If you add a little of the braising liquid to the bag that you freeze it in, the meat will still be moist when you defrost it. Check back for upcoming recipes and ideas for using the braised meats – I have a lot!

Roasted Pork Loin with Beer Braised Cabbage and Butternut Squash Soup

A simple, quick Fall dinner!

Pork Loin and Apple Cider Sauce:

one small pork loin (about 1 lb.)

2 tbsp. cumin

1 tsp. kosher salt

1 tsp. coarse ground black pepper

1 cup apple cider

1 tbsp. creme fraiche (one of my favorite ingredients!)

1 tsp. chopped fresh chives

Rub the cumin, salt and pepper evenly over the pork loin. Heat an oven safe skillet on high heat. Add 2 tbsp. olive oil to the pan, allow to heat up (but be careful to not let the oil start to smoke!). Sear the pork loin on all sides to form a nice golden brown crust. Place the pork loin (in the skillet) into the oven at 400 degrees for about 20 minutes. About half way through cooking, pour 1/2 cup of the apple cider into the pan and leave it in the over to finish cooking (the apple cider will keep it nice and moist). Remove the pork when a thermometer inserted into the thickest part of the meat reads 140 degrees. Let the pork rest for about 10 minutes before slicing.

To create the sauce, place the skillet on the stove top over medium high heat. pour the other 1/2 cup of apple cider into the pan to deglaze it. Make sure you scrape up all of the yummy little brown bits off the pan! Allow the sauce to simmer and reduce by half. Add in 1 tbsp. creme fraiche, stirring until melted,  and 1 tsp. chopped scallions.

Beer Braised Cabbage:

1/2 head purple cabbage (about 1 lb.)

2 apples peeled and sliced thin

1/2 cup apple cider

1/2 bottle of Fall seasonal beer (I used Organic Pumpkin Ale, but you could use an Oktoberfest or something similar)

1/2 a medium-sized sweet onion, thinly sliced

1 tsp. celery salt

salt and pepper to taste

Core and thinly slice the purple cabbage. Heat a pan to medium high heat and add two tbsp. olive oil. Saute the onion for a few minutes, until it begins to turn translucent. Add the cabbage and saute a few minutes. Add salt and pepper to taste. Add the apples and saute a few minutes more. Pour in the apple cider and the beer and allow it to come up to a bubble. Cover the pot ad let the cabbage cook down until it is soft, stirring occasionally.

Simple Butternut Squash Soup:

1 medium-sized butternut squash, peeled and diced small

1 small sweet onion, diced

2 garlic cloves, minced

3-4 cups chicken stock

3 tbsp. fresh chopped chives

creme fraiche, for serving

Saute the onions and garlic in a small soup pot until the onions begin to turn translucent. Add in the butternut squash and saute for a few minutes, add salt and pepper to taste. Add about three cups of chicken stock (make sure the squash is submerged). bring to a boil and cover. Allow the soup to cook until the butternut squash is soft and cooked through. Use a hand blender to blend the soup until smooth. Add in extra chicken stock to thin out the soup if desired. Bring the soup back up to a slow bubble (if you added more chicken stock) and add in the chives. Serve the soup with a dollop of creme fraiche on top.

There you have it – a simple delicious Fall meal made from seasonal veggies. yum!