Pepper Jelly

I have been experimenting with all of the lovely peppers I found at market the past few weeks. 20121023-225739.jpg

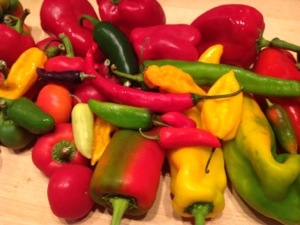
I tried making pepper jelly for the first time and canning it to keep for the wintery months. The first batch came out awesome! It was delicious – not too sweet, not too hot, just the right amount of kick. My second batch was a bit hotter because I switched up the peppers a bit and added in a chocolate Habanero.

I have been reading a lot of pepper jelly recipes from around the web to get ideas. I took a little advice from each of them.

I used a bunch of different peppers from around market. The stand holders have an explosion of them this time of year, as the plants produce their final peppers of the season. Since they are so abundant, you can get a lot of peppers for a little bit of money. I used a spectrum of peppers, in colors and in heat. My first two batches included peppers ranging from Habanero hot to bell pepper mild. Here are some of the peppers that I used: green bell, red bell, cherry pepper, jalapeno, chocolate habanero, anaheim chile, hungarian wax, poblano, serrano, bolivian rainbow (I think), and others that had no label at the market.

Here are a few pepper identification sites from around the web if you don’t know your peppers. some of them also tell you the heat levels – very helpful. Check them out: Epicurious, Chow, and Saveur.

I don’t think the exact peppers you use will matter that much, it’s more about the ratio of hot to mild. I am not very heat tolerant so I used a lot of sweet peppers and kind of mild hot peppers like jalapenos and cherry peppers in the first round. I’m writing a recipe that gives the overall quantity of peppers to use in the jelly mixture. The ratio you use is up to you. I think the best ratio of  4 1/2 -5 cups mild/sweet peppers to 1/2 cup hot peppers. It really depends on the type of hot peppers you use… warning: if you use 1/2 cup of Habanero then your jelly is going to be hot!

Pepper Jelly

5 – 5 1/2 cups peppers

1 1/4 cups apple cider vinegar

3 1/2 tbsp. pectin

1 cup raw honey

2 cups organic cane sugar

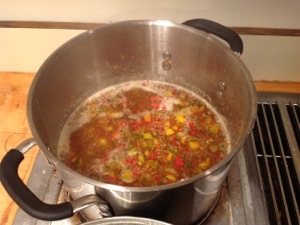
Cut up all of your peppers really small, or put them in the food processor and pulse them until they are cut into small pieces – but don’t turn them into paste.

Bring the peppers and vinegar up to a boil and gradually add in the pectin, stirring constantly. Allow the mixture to boil hard for a few minutes. Add in the sugar and honey and bring the mixture back up to a rolling boil. Allow to boil again for about 5 minutes, stirring the mixture.

20121023-225551.jpg

Prepare your jars and lids. Here’s a really good resource on how to prep your jars so they are clean and sterile.

20121023-225611.jpg

Fill your heated jars with the jelly, leaving about 1/4 inch head-space in each jar, make sure the edges are clean, cover with lids and screw the bands on. Boil the jars for ten minutes and remove from canner. Allow the jars to cool, they will seal and the jelly will set within 24 hours.

20121023-225622.jpg

The seals are usually good soon after you remove them from the canner and they start to cool. Check the lids and if they did not seal within 24 hours then process the jars again. This jelly is not as thick as regular fruit jelly. If your jelly is sliding around in the jar, it is ok! It is a good consistency for placing atop a piece of cheese.

20121023-225629.jpg

A few lessons I learned from reading and from experience:

1. Be very careful when handling the peppers! Wear gloves – seriously, really – wear gloves. If you cut up and clean the seeds out of a bunch of hot peppers… your hands are going to burn. It might not happen right away, but a little while later, or right about when you have to start canning the jelly, your hands are going to be on fire. I have had this happen to me both times I made this jelly. You think I would have learned after the first time, right? Well I did learn but silly me just tried to put plastic baggies on my hands for protection because I didn’t have gloves. That was a mistake because my hands still hurt and burned.

2. I made up another theory about what might be happening to cause the burning on my skin. I have no scientific evidence to back this up so it might sound dumb. I was not wearing gloves while cooking the jelly and all of the steam was hitting my hands as I stirred. I realized that some of the capsaicin had to be going into the air because it was making me cough. So I am not sure, but I thought maybe that was what was making my hands burn. I will be doing more research on this. I will also be buying a box of gloves and wearing them every time I cut up a bunch of hot peppers.

3. The jelly is a thinner consistency than fruit jelly normally is. I like this consistency. It is good for spreading on a cracker with cheese. If you like your jelly a little thicker, add about 1/2 tbsp more of pectin to your batch. I also read that some people drain their peppers before they cook them with the vinegar. I didn’t want to do that because I felt like I was loosing a bunch of the flavor.

4. I list 5-5 1/2 cups of peppers because it is hard sometimes to get an exact amount with out wasting some of the peppers. I also don’t think that it’s necessary to be that exact when measuring out the peppers. I had a few little differences in the batches I made and they both came out great. You should measure out the other ingredients pretty accurately because the other ingredients will have more of an affect how your jelly turns out.

5. I used the small 4 oz. ball jars. This batch filled about 16 of them. I think they are a great way to serve the jelly. You can set the jar out next to a piece of cheese and it looks cute with a little serving spoon in it. You don’t have to search for a small serving bowl and you can just put the lid back on if there is any left… but there probably won’t be any left.

20121017-231723.jpg

I paired this savory jelly with wheat crackers and a specialty aged cheddar cheese from Cabot Creamery. This is my new favorite snack… and quiet possibly my favorite cheese combination ever! You will be hooked after you try it.

If you are interested in cheese making – I know I am – then watch this video on one of Cabot’s specialty cheeses. I would love to visit the place where they age all the cheeses or visit the creamery itself.

Thanks to my chef friend Aaron for some inspiration with the pepper jelly and paring, I had his version a few weeks back and it was amazing!

20121017-231733.jpg

Advertisement

Grilled Sausages with peppers and onions

I have been trying to use the grill in new ways lately. I wanted to use the cast iron skillet over hot coals to cook something. So, I grilled some onions and peppers in a cast iron skillet to eat with grilled turkey sausages. It was a quick and easy dinner.

20120910-202519.jpg

20120910-202556.jpg

I cut up the peppers and onions and tossed them with olive oil, salt and pepper. They went into a small cast iron skillet that I heated on the grill. Once they are on the grill, make sure you turn them over a few times with the tongs or they will burn. I placed the sausages on the outer part of the grill so they cooked a little slower.

20120910-202628.jpg

The sausages stayed nice and moist and juicy on the grill. I tossed the sausages into the cast iron skillet after I removed the peppers and onions – just for a minute – to make the outside of them pick up some of the sausage and onion juices left in the skillet.

20120910-202648.jpg

20120910-202717.jpg

I made a spread with spicy brown mustard and horse-radish to spread on the buns: 2 parts mustard to one part horse-radish. Then piled bun with a sausage link and peppers and onions.

20120910-202754.jpg

20120910-202820.jpg

I would like to try to cook other foods on the cast iron skillet. I am open to ideas, so leave a comment if you have any!


Lovely Saturdays

I brought a visitor to market with me this weekend – my Mom! My parents were visiting and I showed my mom around downtown.  She loved it! It makes me really happy to share the places I love with the people I love. The weather was a little dreary but we still had a great time walking around.

I had a great Saturday last weekend as well… I have been feeling like this lately:

*letter pressed post card created by Moxie House and available at FIG Central.

Let me tell you about last weekend…

Last Saturday I went down to Central Market as usual. My intent was just to run down and get some veggies, make my way home and get some house work done. Instead I ended up spending all afternoon downtown enjoyably wasting the day.

The day started off pretty gloomy and rainy. By the time I was ready to leave the house it started clearing up so I decided to take my chances and walk downtown. It turned out to be a beautiful day! The sun came out – it felt so good! We have been having so many rainy days lately it was nice to be outside as the summer days are turning into fall.

I wandered in and out of a few shops along King and Queen Streets. I stopped in Fig central and Party Perfect, Zanzibar, Festoon and a few more places. I like to go in and out of the downtown shops from time to time just to see what’s new. I usually don’t end up buying much but it’s pretty fun to look at all of the odds and ends that are hidden inside.

Market was hustling and bustling. All the vegetables are starting to change. The bounty of summer is becoming the harvest of fall. Which is ok with me, it just means warm comfort foods will start being made in my kitchen. For a few short market days, you can get the last of the summer veggies and the first of the fall veggies at the same time.

I bought my last box of local multicolored cherry tomatoes last week, along with my last bunches of local basil with giant leaves. I didn’t find any of them at market this week. I am sad to say good-bye to some of my favorite ingredients but happy to start buying squashes again.

There is a pepper boom right now. Everyone has homegrown peppers. One thing that I love about the homegrown peppers around here is that they are always a mixture of colors. The yellow peppers are always yellow and green, the red and red and green, and the green are green and purple! Peppers are also really cheap right now (3 for $1!) so I bought a bunch and decided that I am going to make stuffed peppers this week.

I made a very welcomed discovery while inside market… there is a stand that carries local garlic! I can’t believe I haven’t noticed it until now. I always wanted a steady source of local garlic at central market. Occasionally, the Lancaster Farm Fresh Cooperative carries local garlic, but it sells out quickly and it’s not there all the time. I was really happy to find that Rafiki’s Deli had a special table dedicated to garlic from Promised Land Farms.

I chose to two varieties to try: Artichoke and Siberian. They are both really fragrant. I definitely notice a difference between the local garlic and the varieties imported from California and China. There is so much more flavor! One thing I can not understand is why we import garlic from so far away – It seems really silly when you think about how much it must cost to ship it that far.

I was meeting Janeen for lunch and I decided to wait outside for her since the sun was shining. I sat looking at market alley wishing that someone would put some tables out there…

They already block off the entrance so cars can’t drive down here. And what a prefect place for tables! You would be able to get food inside of market and sit outside, enjoying your lunch in the fresh air. It would be awesome! A restaurant could even take over that area. I would love to have a good lunch with a lunch-time beer outside.

We had lunch at Spring House Brewery’s TapRoom. Which is inside, but there are a lot of big windows so at least it was sunny and bright.

We tried the Mango IPA and Braaaiiins (pumpkin ale). The mango IPA was fruity but not too sweet. I thought it was going to be too flavored for me but it was delicious, a really nicely balanced fruit beer.

I always like a good pumpkin ale, so I was hoping Braaaiiins was a good one. Spring House’s version of pumpkin beer tasted like pumpkin pie, nice and spicy with a hint of nutmeg. Not my favorite pumpkin beer (more on that one at a later date), but I have to say, Braaaiiins is pretty solid. It will probably be my beer of choice whenever I go into the TapRoom this month.

This was my first time eating lunch at the TapRoom. I’ve had a few bar snacks there at night like the pulled pork quesadilla. I was never disappointed with the bar food so I assumed lunch would be pretty good. I had the split pea and ham soup and a garden salad. Both were good and the basil balsamic dressing on the salad was excellent.

Leftovers! Couscous

I asked Dan to take chicken out of the freezer during the day so it could defrost by the time I got home from work. I wanted to make barbecue chicken on the grill but that required a bunch of pieces of bone-in chicken thighs and legs. Dan only took out two small boneless skinless chicken thighs. Oops, I probably should have been more specific about the chicken…

So what was I going to make for dinner now?

I had about 1 1/2 cups of cooked couscous left over from my summer fish in a pouch.

I also had some nice big peppers from market. They are in season right now and they are really cheap! I decided to make stuffed peppers with chicken and couscous filling.

Here how to do it:

Couscous Stuffed Peppers

1 1/2 – 2 cups cooked couscous (I used my lemon parsley left over couscous but you could use any kind you have)

1 medium yellow squash

1/2 small red onion, chopped

2 garlic cloves, minced

1 cup chicken stock

4 plum tomatoes, chopped

2 boneless skinless chicken thighs

handful of basil leaves, chopped

4 large peppers (any color)

Cut the tops off the peppers, remove the seeds and place them in a 9×9 inch baking dish.

Season the chicken thighs with salt and pepper on both sides. Coat a deep saute pan with olive oil and saute the chicken thighs until a nice golden crust forms – don’t remove all of the excess fat from the thighs, you want a little bit to render in the pan to give it a deeper flavor.

Saute the onion and garlic with the chicken for about two minutes. Add 1/2 cup of chicken stock to the pan – the chicken stock will help you deglaze the pan – so scrape up all those good little brown bits, they have lots of flavor in them!

Add the tomatoes into the pan, season with salt and pepper and cover. Bring the mixture up to a bubble and cook over medium heat for about 5 minutes. Pull out the chicken thighs and shred them.

Small dice your yellow squash and mix it into the left over couscous. Make sure you break up the couscous because sometimes is gets clumped together in the refrigerator.

Mix the chicken, basil, and the tomato mixture into the couscous. divide the mixture and spoon it into each of the peppers. You may have to push down and mound it in the peppers. Use it all! It’s ok if the peppers are overflowing.

Pour the other 1/2 cup chicken stock into the bottom of the baking dish. Drizzle some extra virgin olive oil over the tops of the mounds of couscous. Cover the dish with aluminum foil and bake at 350 degrees for 30 minutes.

The couscous filling won’t look that much different once it is baked, but the peppers will be soft and juicy. The chicken stock that we added to the bottom of the dish before baking keeps everything nice and moist.

This is a great all in one dinner, no sides needed… and you used your leftovers!